Battery switch on travel trailer function is crucial for managing your RV’s power. This guide breaks down everything you need to know about your travel trailer’s battery switch, from understanding its purpose and different types to troubleshooting problems and ensuring safe operation. We’ll cover connecting and disconnecting batteries, power management strategies, and safety precautions to keep your RV running smoothly.
Understanding your battery switch is key to preventing electrical issues and maximizing your RV’s power. We’ll explore the various types of switches, their functionalities, and how to use them correctly. Proper maintenance and understanding power management will help extend the life of your batteries and ensure a more enjoyable camping experience.
Understanding Battery Switch Function in Travel Trailers
Your travel trailer’s battery switch is a crucial component of its electrical system, acting as a central control for power distribution from your house batteries. Understanding its function and operation is key to preventing electrical problems and ensuring a smooth camping experience. This section will explain how these switches work and the different types available.
The primary purpose of a battery switch in a travel trailer is to isolate or connect your house batteries to the trailer’s electrical system. This allows you to disconnect the batteries completely to prevent drain when the trailer isn’t in use, or to selectively power different parts of your trailer’s electrical system from different battery sources. This is especially important for preventing damage from parasitic draws which can slowly drain your batteries over time.
Battery Switch Types
Several types of battery switches are commonly used in travel trailers, each offering varying levels of control. The most common types are the 1-2-Both switches and 1-2-Off switches. Understanding the differences is essential for safe and effective battery management.
| Switch Type | Positions | Functionality | Benefits |
|---|---|---|---|
| 1-2-Both | 1, 2, Both | Selects either battery 1, battery 2, or both batteries to power the trailer’s electrical system. | Provides flexibility in managing two battery banks, allowing for separate charging or use. Useful for systems with separate house and starting batteries. |
| 1-2-Off | 1, 2, Off | Selects either battery 1 or battery 2, or completely disconnects both batteries from the trailer’s electrical system. | Offers complete battery isolation for storage, preventing parasitic drain. Simpler to operate than a more complex switch. |
Operating a Battery Switch
Proper operation of your battery switch is vital to prevent accidental discharge and maintain your battery’s health. Always consult your trailer’s owner’s manual for specific instructions, as the switch’s location and operation might vary slightly between models. However, the general steps are as follows:
- Locate the switch: Battery switches are typically located near the batteries themselves, often inside a compartment or under a hatch.
- Identify the positions: Familiarize yourself with the switch’s markings (1, 2, Both, Off). These indicate which battery or combination of batteries is connected.
- Select the desired position: Carefully turn the switch to the appropriate position. If you’re storing the trailer, move the switch to the “Off” position to completely disconnect the batteries.
- Verify the connection: After switching, check your trailer’s electrical system to ensure power is functioning correctly (or not functioning, if the switch is in the “Off” position).
Connecting and Disconnecting Batteries
Connecting and disconnecting your travel trailer’s batteries is a crucial task that requires care and attention to detail. Improper handling can lead to damage to your batteries, your electrical system, and even personal injury. This section details the correct procedures and safety precautions to ensure a smooth and safe process.Connecting and disconnecting the house and chassis batteries involves accessing the battery switch, usually located near the batteries themselves.
The switch will have clearly labeled positions for connecting and disconnecting both battery banks, and often a position to isolate both banks. Always refer to your specific travel trailer’s manual for detailed instructions and diagrams as the layout may vary slightly between models.
Battery Connection Safety Precautions
Working with batteries involves potential hazards. Always prioritize safety by taking the following precautions: Wear appropriate safety glasses or goggles to protect your eyes from splashes of battery acid. Ensure adequate ventilation in the area where you are working, as battery gases can be harmful. Never smoke near batteries, as the gases are flammable. Wear gloves to protect your hands from acid and corrosion.
Have baking soda and water on hand to neutralize any acid spills. If you’re unsure about any step, consult a qualified technician.
Consequences of Incorrect Battery Connection
Incorrectly connecting or disconnecting batteries can lead to several problems. A short circuit, caused by accidental contact between positive and negative terminals, can generate significant heat, potentially causing damage to the batteries, wiring, and even fire. Reverse polarity, connecting the positive and negative terminals in the wrong order, can severely damage sensitive electronic devices connected to your trailer’s electrical system.
Finally, incorrect connections can lead to premature battery failure and reduced battery life.
Battery Connection and Disconnection Flowchart
The following flowchart illustrates the correct sequence for connecting and disconnecting your travel trailer batteries. Remember to always consult your owner’s manual for specific instructions related to your trailer model.[Imagine a flowchart here. The flowchart would visually represent the following steps:
1. Start
Ensure the battery switch is in the “OFF” position.
2. Ventilation
Ensure adequate ventilation around the batteries.
3. Safety Gear
Put on safety glasses, gloves, and have baking soda/water nearby.
4. Connect Chassis Battery (if applicable)
Connect the chassis battery to the charging system if it’s separate from the house battery.
5. Connect House Battery
Turn the battery switch to the “ON” position to connect the house battery.
So, you’re planning a trip? Awesome! First things first: get yourself sorted with travel insurance. Check out Aon travel insurance for solid coverage. Then, if you’re an audiophile like me, don’t forget your tunes! Setting up your audiophile travel setup beforehand is key for enjoying those amazing playlists on the go. Seriously, it makes all the difference to your journey.
Happy travels!
6. Verify Connections
Check all connections for tightness and proper polarity.
7. Disconnect House Battery
Turn the battery switch to the “OFF” position to disconnect the house battery.
8. Disconnect Chassis Battery (if applicable)
Disconnect the chassis battery from the charging system.
9. End
Ensure all connections are secure and store safety gear properly. ]
Troubleshooting Common Battery Switch Issues
Your travel trailer’s battery switch is a critical component, ensuring you have power when you need it. Problems with this switch can leave you stranded without lights, refrigeration, or other essential systems. Understanding common issues and how to troubleshoot them is key to a smooth camping experience.
Troubleshooting a faulty battery switch often involves systematically checking different parts of the system. This can range from simple checks like verifying power sources to more involved tasks such as replacing fuses or the switch itself. Remember, safety is paramount; always disconnect the battery before working on any electrical components.
Common Battery Switch Problems and Solutions, Battery switch on travel trailer function
Several common problems can arise with your travel trailer’s battery switch. These typically manifest as a complete lack of power or intermittent power failures. Knowing how to identify and address these issues is crucial for maintaining your RV’s functionality.
So, you’re planning a trip? Awesome! First things first: get yourself sorted with travel insurance. Check out Aon travel insurance for solid coverage. Then, if you’re an audiophile like me, don’t forget your tunes! Setting up your audiophile travel setup beforehand is key for a truly enjoyable trip. Make sure to pack appropriately and enjoy the journey!
- No Power to the Trailer: This could indicate a blown fuse in the switch itself, a faulty switch, or a problem with the battery connections. Check the fuse first, replacing it if necessary. If the problem persists, inspect the switch for damage or corrosion and test the battery’s voltage. If the battery is good, the switch might require replacement.
- Intermittent Power: This suggests a loose connection somewhere in the system, possibly at the battery terminals, the switch itself, or in the wiring leading to the trailer’s electrical system. Carefully inspect all connections for corrosion, looseness, or damage, tightening or cleaning as needed. A failing switch can also cause intermittent power, requiring replacement.
- Blown Fuses: Repeatedly blowing fuses usually indicates a short circuit somewhere in your trailer’s wiring. This is a serious problem that needs immediate attention to prevent further damage. Tracing the wiring to find the short circuit requires patience and some electrical knowledge. If you are not comfortable doing this yourself, consult a qualified RV technician.
Battery Switch Maintenance
Regular maintenance is vital to prevent problems and extend the lifespan of your battery switch. Neglecting this can lead to premature failure and costly repairs.
Regular maintenance should include visually inspecting the switch for corrosion, loose connections, and physical damage at least twice a year, or more often if you frequently use your trailer in harsh conditions. Clean any corrosion with a wire brush and battery terminal cleaner. Tighten any loose connections. If you notice any damage, replace the switch immediately.
Troubleshooting Steps
A systematic approach to troubleshooting is crucial for efficiently identifying and resolving battery switch problems.
- Check the Fuses: Begin by inspecting all fuses related to the battery switch and the trailer’s electrical system. Replace any blown fuses with fuses of the correct amperage. If fuses keep blowing, there is a short circuit that needs to be addressed.
- Inspect the Battery Connections: Examine the connections between the battery and the switch. Look for corrosion, looseness, or damage. Clean any corrosion, tighten loose connections, and repair any damage.
- Test the Battery Voltage: Use a multimeter to measure the voltage of your battery. A low voltage reading indicates a weak or faulty battery, which needs to be replaced or charged.
- Examine the Battery Switch: Inspect the battery switch itself for any signs of damage, corrosion, or looseness. If the switch appears damaged, it likely needs replacement.
- Check the Wiring: If the previous steps haven’t resolved the problem, carefully inspect the wiring leading to and from the battery switch for any breaks, shorts, or loose connections. This may require tracing the wires throughout the trailer’s electrical system. If you’re not comfortable with this, call a professional.
Battery Switch and Power Management
Your battery switch is the central nervous system of your travel trailer’s power, controlling the flow of electricity from your batteries to your appliances. Understanding how it works and how to manage your power consumption is key to enjoying a comfortable and reliable off-grid experience. Efficient power management ensures your batteries last longer and prevents unexpected power outages.Understanding how the battery switch impacts power distribution is crucial for preventing problems and maximizing your power resources.
When the switch is in the “off” position, all power flow from your batteries is interrupted. In the “battery” position, power from your house batteries flows directly to your 12-volt appliances. In the “combined” position (if your switch has this option), power from both the shore power and your house batteries is available, with the shore power typically prioritized.
This setup means that when you’re plugged into shore power, your appliances run off the mains electricity, and your batteries are only used if there’s a power outage or you’re not connected to shore power.
Power Consumption Management for Extended Battery Life
Proper power management significantly extends the lifespan of your RV batteries and ensures you have enough power when you need it. This involves understanding the power demands of your appliances and making conscious choices about their usage. For instance, running your air conditioner for extended periods will drain your batteries much faster than using LED lights. Prioritizing essential appliances and limiting the use of high-draw devices like microwave ovens and hair dryers, especially when off-grid, is vital.
Regularly checking your battery voltage with a multimeter helps you monitor their charge level and anticipate when you need to recharge. A fully charged 12-volt battery typically reads around 13.2 volts. As the battery discharges, the voltage drops.
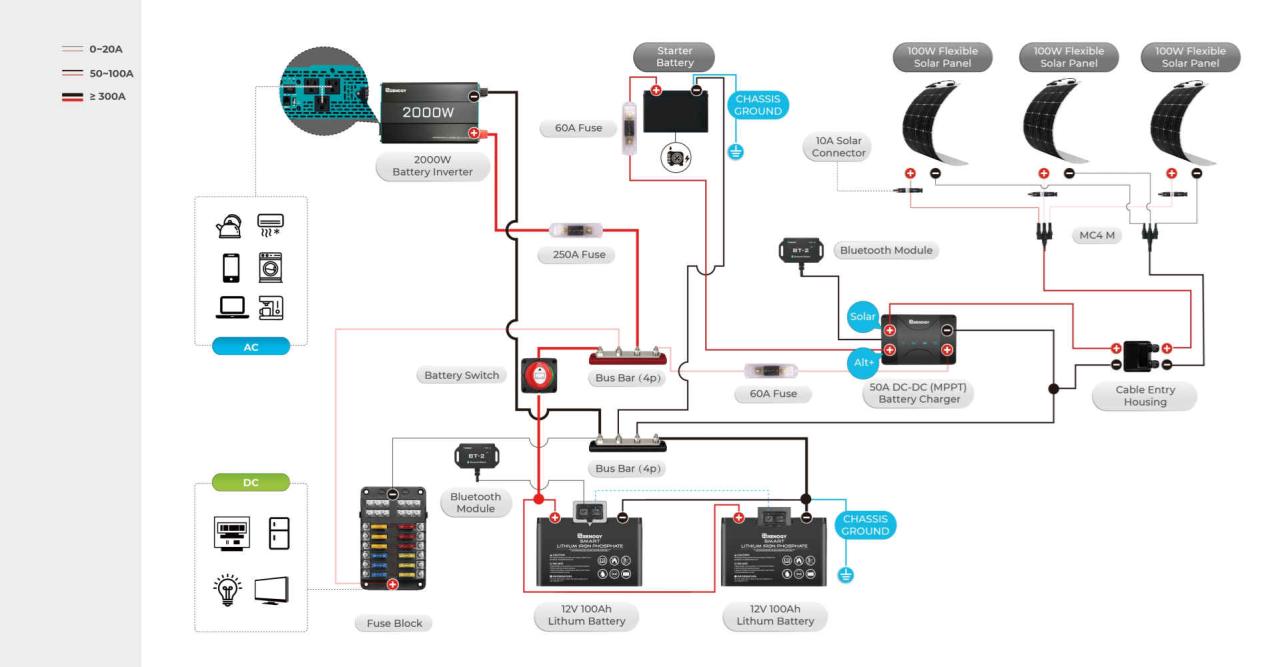
Power Management Strategies: Inverters, Solar Panels, and More
Different power management strategies can significantly enhance your off-grid capabilities. Inverters convert 12-volt DC power from your batteries into 120-volt AC power, allowing you to use household appliances. However, inverters consume power even when idle, and their use significantly increases battery drain. Solar panels harness sunlight to recharge your batteries, providing a sustainable and renewable energy source.
The size and number of panels needed depend on your energy consumption and the amount of sunlight you receive. A combination of solar panels and a generator offers a robust power solution, providing both renewable and backup power. Consider using energy-efficient appliances, LED lighting, and low-power electronics to minimize your overall energy consumption.
Calculating Power Usage and Estimating Battery Runtime
Accurately estimating battery runtime requires understanding both your battery capacity (measured in amp-hours, Ah) and your power consumption (measured in watts, W). For example, a 100Ah battery theoretically provides 100 amps for one hour, or 10 amps for 10 hours. However, this is an idealized scenario. In reality, factors like battery age, temperature, and discharge rate affect actual runtime.
To estimate runtime, you first need to calculate your total power consumption. Let’s say you’re using a 100-watt refrigerator for 5 hours, a 50-watt fan for 8 hours, and a 10-watt light for 6 hours. Your total watt-hours (Wh) is (100W
- 5h) + (50W
- 8h) + (10W
- 12V) ≈ 0.97 hours. This calculation is simplified and doesn’t account for losses. It’s crucial to consider a safety margin and expect shorter runtime in real-world conditions. Remember to always consult your battery’s specifications for the most accurate information. Furthermore, a deeper-cycle battery is designed for repeated discharge and recharge cycles, making them more suitable for RV use than standard car batteries.
6h) = 1160 Wh. To find the approximate runtime, divide your total watt-hours by the battery’s capacity in amp-hours, accounting for voltage (most RV batteries are 12V)
Runtime (hours) ≈ (Total Wh) / (Battery Ah
Battery Voltage). In this example, assuming a 100Ah 12V battery
Runtime ≈ 1160 Wh / (100Ah
Battery Switch and Safety Features
Your travel trailer’s battery switch is more than just an on/off switch; it’s a crucial safety component protecting you from electrical hazards. Understanding its function and employing safe operating practices is vital for a worry-free camping experience. Improper use can lead to electrical shocks, short circuits, and even fire.The battery switch acts as a master control, disconnecting the trailer’s battery from the electrical system when turned off.
This prevents accidental shorts, protects against parasitic drain (slow battery discharge even when not in use), and minimizes the risk of electrical shock when working on the trailer’s wiring. When the switch is off, it creates a complete break in the circuit, isolating the battery and preventing current flow to the trailer’s appliances and systems. This is especially important when storing your trailer for extended periods or performing maintenance.
Safe Operation of the Battery Switch
Safe operation hinges on understanding your trailer’s specific switch and its location. Always turn the switch off before performing any electrical work on your trailer. Before connecting or disconnecting any appliances, ensure the switch is in the “off” position. Regularly inspect the switch for any signs of damage, corrosion, or loose connections. A damaged switch should be replaced immediately by a qualified technician.
Never attempt to bypass or modify the switch’s functionality. Always double-check the switch’s position before leaving your trailer unattended for any length of time. If you’re unsure about any aspect of your battery switch operation, consult your trailer’s manual or a qualified RV technician.
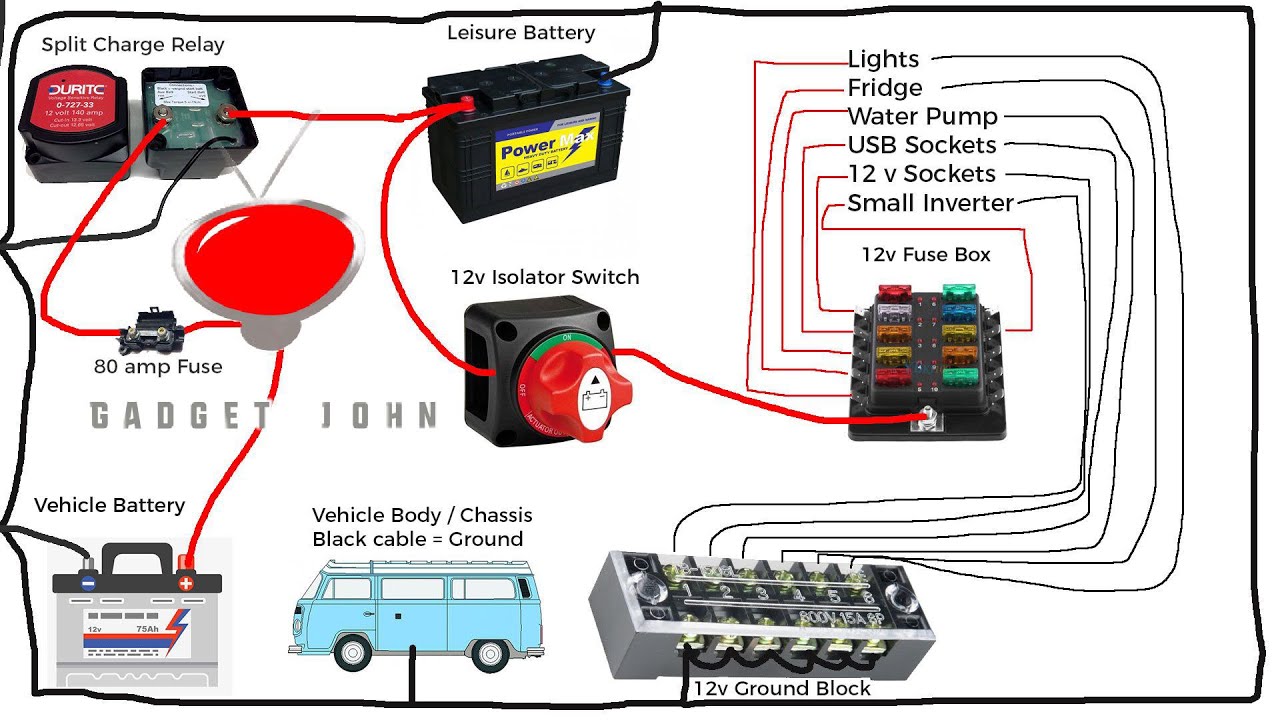
Understanding the Travel Trailer’s Electrical System
A thorough understanding of your travel trailer’s electrical system is paramount for safe operation and effective troubleshooting. The system typically includes the battery, battery switch, converter, distribution panel, and various appliances (lights, refrigerator, air conditioner, etc.). Knowing how these components interact is essential for preventing electrical issues and ensuring safety. The battery provides DC power, the converter changes DC to AC, and the distribution panel directs power to different circuits.
Tracing the flow of electricity through these components helps you diagnose problems and understand the role of each part. Familiarize yourself with your trailer’s wiring diagram to better understand the system’s layout and functionality. This knowledge is crucial for preventative maintenance and quick identification of potential problems.
Electrical Flow Diagram
Imagine a diagram. At the top is the 12V battery. A thick line represents the positive (+) cable running directly from the battery’s positive terminal. This cable leads to the battery switch. The switch is depicted as a simple on/off toggle.
When the switch is “on,” the positive cable continues, depicted as a solid line, flowing to a distribution panel. This panel is shown as a box with multiple outgoing lines representing various circuits (lights, appliances, etc.). Each circuit is labeled. A separate, thicker line represents the negative (-) cable, which directly connects from the battery’s negative terminal to the chassis ground of the trailer.
This ground provides a return path for the current. When the switch is “off,” a gap appears in the positive cable line between the battery and the distribution panel, visually indicating the break in the circuit, effectively isolating the battery from the trailer’s electrical system. All outgoing circuits from the distribution panel are also shown to terminate at the trailer chassis, completing their respective circuits via the ground.
This diagram clearly illustrates the role of the battery switch in controlling the flow of electricity to the trailer’s systems.
Different Battery Switch Configurations: Battery Switch On Travel Trailer Function
Travel trailers utilize various battery switch configurations to manage power from different sources, typically the tow vehicle and onboard batteries. The choice of configuration significantly impacts system complexity, cost, and overall functionality. Understanding these differences is crucial for selecting the right system for your needs.
Several factors influence the selection of a battery switch configuration, including the number of batteries (house and chassis), the desired level of power management, and budget considerations. Each configuration offers a unique balance of features and limitations.
Single Battery Switch
This simplest configuration uses a single switch to connect either the tow vehicle’s battery or the trailer’s house battery to the trailer’s electrical system. Only one power source can be active at a time.
Advantages include low cost and simplicity. Disadvantages include the inability to charge both batteries simultaneously and the inconvenience of switching between sources. This setup is suitable only for trailers with minimal power demands and those rarely disconnected from the tow vehicle.
Dual Battery Switch with Combined Output
This configuration employs two switches, one for each battery (house and chassis). Each switch can connect its respective battery to the trailer’s electrical system independently, or both can be combined to power the system.
Advantages include the ability to charge both batteries simultaneously (if the charger is designed to handle multiple batteries) and to use either battery as a primary power source. Disadvantages involve slightly higher cost and complexity compared to a single switch. This is a common choice for many travel trailers.
Battery Combiner with Automatic Switching
This advanced configuration uses a battery combiner with automatic charging and switching capabilities. The combiner intelligently manages power flow between batteries, ensuring both are charged and providing seamless switching between sources. It may include features like preventing deep discharge and prioritizing power sources.
Advantages include automated power management, protection against battery damage, and enhanced convenience. Disadvantages are the higher initial cost and increased system complexity. This configuration is best suited for trailers with higher power demands and users prioritizing convenience and battery protection.
Comparison Table of Battery Switch Configurations
| Configuration | Number of Switches | Simultaneous Charging | Independent Battery Use | Cost | Complexity |
|---|---|---|---|---|---|
| Single Battery Switch | 1 | No | No | Low | Low |
| Dual Battery Switch with Combined Output | 2 | Potentially (dependent on charger) | Yes | Medium | Medium |
| Battery Combiner with Automatic Switching | Often integrated into the combiner | Yes | Yes (automatic prioritization) | High | High |
Mastering your travel trailer’s battery switch is about more than just turning power on and off; it’s about understanding your RV’s electrical system, ensuring safety, and maximizing battery life. By following the guidelines and troubleshooting tips Artikeld here, you can confidently manage your power, prevent problems, and enjoy worry-free adventures. Remember, regular maintenance and a little preventative care go a long way in ensuring a smooth and enjoyable RV experience.
FAQ Corner
What happens if I leave my battery switch on all the time?
Leaving your battery switch on constantly can drain your batteries, especially if you have devices drawing power even when the trailer isn’t in use. This can lead to dead batteries and potentially damage your electrical system.
How often should I check my battery switch?
Regularly inspect your battery switch for corrosion, loose connections, and proper operation. A visual check before each trip is recommended.
Can I use a different type of battery switch in my travel trailer?
Replacing your battery switch requires careful consideration. Ensure the replacement switch has the correct amperage rating and wiring configuration for your system. Consult an RV electrician if you’re unsure.
My battery switch is making a clicking sound. What’s wrong?
A clicking sound often indicates a problem with the switch itself, a low battery, or a blown fuse. Check your fuses and the battery voltage before attempting further troubleshooting.
